Recently, I was asked by a lovely reader to demonstrate how I apply my eyeshadow as it relates to my eyeshape. As you may or may not realize, the purpose of eyeshadow is to shape and define the eyes, either using highlighting or contouring.
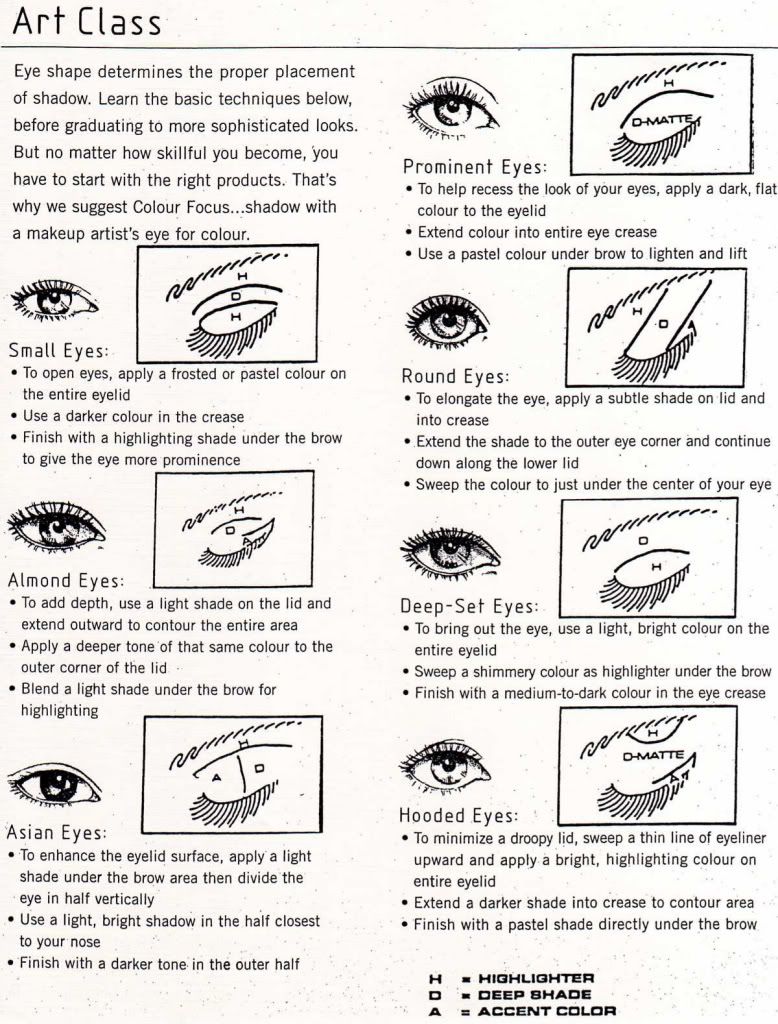
For a general overview, here is a lovely chart on eyeshadow placement for your eye shape.
source: www.specktra.net
So according to this chart, for example, I have Prominent Eyes, that are also quite Round. That said, the advice for me is to apply a darker matte shade to the lid, and a highlight color to the browbone area. I personally don't like a very dark matte color all over my lid like that, so I choose to do something a little different.
I prefer to actually focus more on the lengthening the eyes, placing shadows to contour them from a round shape into an almond shape. This allows me to use a variety of colors in the light to medium range instead of always walking around with a smokey eye (which to me makes my large eyes stand out more).
So this is how I apply my eyeshadow, using natural eyeshadow colors:
1) After applying a primer and a base, I take a matte light-to-medium shade (MAC Bamboo) and apply it all over the lid and up towards the browbone.


2) Next I take a medium matte shade (MAC Saddle) and apply it from lashline to crease, lightly blending into the light matte shade, but not going above the crease.


3) Then I take the darker matte color (MAC Charcoal Brown) and draw in my outer v shape. Blending well for a subtle contouring. I extend the color past my eye to make an outer v or cat-eye shape. This is meant to lengthen my eye, so I also carry the colors to the lower lashline to close off the eye (which makes the eyes smaller).


4) Next, I line my eyes with black or dark brown liner (today I'm using brown - MAC Dipdown Fluidline) on the upper lashline and wing it out on the ends, then lightly extend the liner on the outer part of the lower lashline.


When I want more definition, I also line the lower lashline, smudging the outer lower lashline sort of winged out too to intensify the cat-eye shape. But today I'm going more natural :-)
5) Next, I apply my highlighter color to my browbone, which is lighter than the color I used in Step 1 (maybe 2-3 shades lighter), and is shimmery. This balances all the matte eye shadow I've used on the rest of my eye.


6) Curl lashes, apply mascara, and we're done!


Some rules I do follow that are good for large eyes:
- Keep light frosty colors off the whole lid as the main color--this makes the lid protrude more. I prefer to keep light frosty colors on the inner eye/inner v or on the browbone.
- Don't darken the whole crease--again, this protrudes the eye. I stay with in the outer v, and blend light matte colors in my crease instead.
- Always use liner/shadow on the lower lash line with medium dark colors. Again, any light colors are only in the innermost part of the tear duct.
- Remember: Light and/or shiny colors maximize, dark and/or matte colors minimize. This helps you figure out which eyeshadow goes where.
Because I really like color and I have tons of shimmer shades, I do this same method with those, but I try to use a satin (not frosty or glittery) shadow on the lids. Where the color goes usually depends on how light or dark it is. I experiment and make sure to balance my looks with matte shadows at every opportunity. I study my eye shape to make sure I am making the best of my features.
Hope this helps you do the same :)
Let me know what you think!


